Onigiri are rice balls wrapped in seaweed, and I think they are both tasty and cute 🙂 Their round shape inspired me to create this coin purse tutorial. Instead of filling your onigiri with dried plums or shrimp, you can instead stuff it full of coins and the miscellaneous debris that gathers at the bottom of your purse.

You’ll need fleece for the outer layer and any cotton fabric for the lining. I used some fabrics leftover from previous projects.
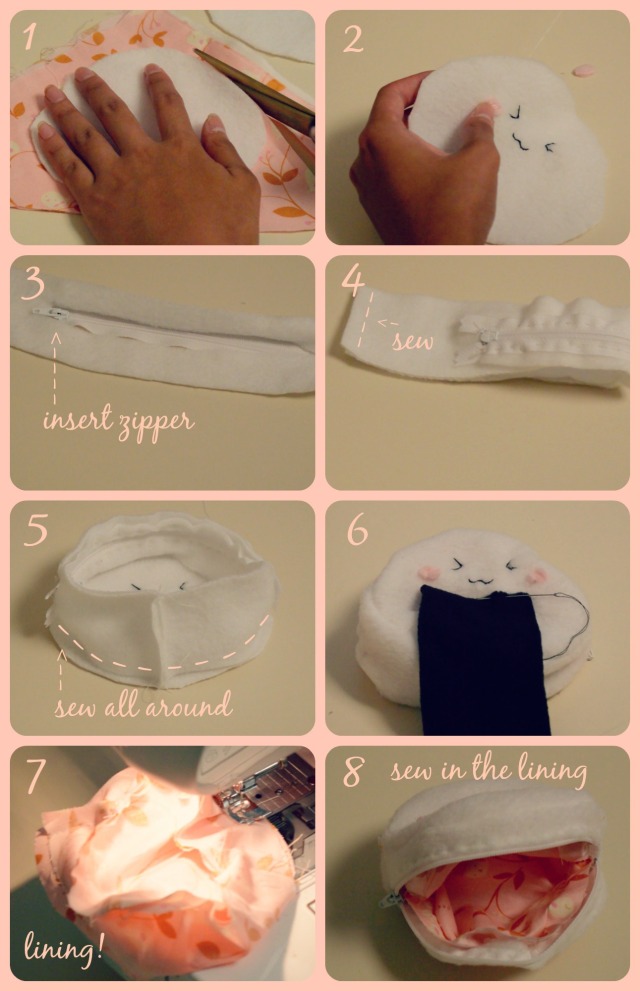
1. Cut out the pieces – Using the white fleece, cut out two triangles with rounded corners and a rectangle that is 3 inches wide and as long as the perimeter of your triangles. Make the triangles as big as you want your pouch to be, and remember to add seam allowance. Using your lining fabric, cut out lining pieces that are the same size as your fleece triangles and rectangle.
2. Glue or embroider on the face of your onigiri. I first marked out the face with pencil.
3. Insert the zipper. The cut for the zipper should be half as long as the rectangular piece, and it should be centered in the middle of the rectangle. Fold your rectangle in half length-wise and make a cut in the middle. Extend the cut on either side until it is the proper length. Insert the zipper. If you need extra help, check out this tutorial.
4. Fold the rectangle in half length-wise, right-sides facing together and sew along the edge. Make sure the zipper is facing the right way! You should now have a circular piece that will be the middle section of your purse.
5. Line up the edge of the circular piece with the edge of one of the triangle pieces. Sew all around, making sure right sides are facing together and seams are facing outwards. The zipper should be centered on the topmost point of the triangle – this is the top of your coin purse. Repeat with your second triangular piece and the other edge of the circular piece. Make sure to leave a gap so you can turn your purse right side out! Leave the gap at the bottom of the purse because this spot will be covered by the onigiri’s seaweed.
6. Cut out a rectangle of black fleece that is long enough to wrap from the center of the front triangle to the center of the back triangle. It should be about as wide as half the triangle piece. Sew this on your onigiri using a straight stitch.
7. Repeat steps 4 – 6 with your lining fabric, but do not add a zipper. Your lining should be shaped just like your outer cover. The only difference should be a lack of a zipper.
8. Insert the lining into the purse, making sure that the seams are facing together. Sew the edge of the lining to the edge of the purse, rolling down the raw edges as you sew.
And you’re finished! This is a super great DIY for using your hand-sewing skills. I actually made this purse almost a year ago (but took forever to edit the tutorial….) and my purse is still intact. It’s super durable, and I get lots of compliments on it! 🙂
On another note, I have to apologize for being MIA for the past month – I’ve been bouncing around the country and settling into my internship, and the lack of sewing supplies has made it difficult for me to create tutorials. Now that I’m back in the Bay, I hope to be making some cute tutorials for the tail-end of summer. Thanks for sticking around!

Such a great tutorial, I love the video. That lining is such a fun pattern! 🙂
LikeLike
This is adorable! 🙂
LikeLike
Thank you! 😀
LikeLike